
HOME / POSTS / SAND CAST ENGAGEMENT RINGS
Sand Cast Engagement Rings
February 2018 Bianchini-Love
Project Documents
This is a special project that we are excited to present. During our last semester as undergraduates at MIT, we set out to create our own engagement rings. While the final rings are made of platinum, a pair of bronze and stainless steel rings were also made as part of the experimental process. In addition to the rings, we also created a wooden box to protect and house the rings when not on a finger. Built in the Course 3 foundry at MIT, the final product is a unique set of rings that have a special meaning to both of us.
Process overview
In the video below, you'll get an overview of our process in the form of just photos and video snippets. We will go into more detail in the sections following.
We are both fans of old things that look like how they were made. Since Bibit was using the foundry at MIT to work on a larger sand casting project in the fall of 2017, she got us insider access to the MIT Course 3 foundry in the basement of the Infinite Corridor. Our tastes plus this unique resource led us to make sand cast rings.
Our material choice was platinum due to its hypoallergenic and robust properties, though not for its availability and associated cost. Because it would have been infeasible for us to get enough platinum to fill a large sand casting sprue and runner system, we developed a way to achieve a sand cast look through investment casting a form that was replicated from a sand cast ring. More on this later.

The process we created in order to achieve the sand cast look in platinum rings. Note: there is a non-fuzzy version of this uploaded as "process_diagram.pdf" that you can view instead for more of the detail -- see the file listed under "Project Documents".
Test rings

Part 1 is the test rings. This section will highlight each of these steps.
To determine what size we needed and what shape we liked, we first made CAD models of different ring profiles and sizes. We then 3D printed several of these to test their look and fit to our actual fingers. We were able to 3D print these for free using Ultimaker 2 3D printers in MIT MakerLodge.

CAD model of a test ring sizer.
We incorporated a size label on each to make things easier. Note that the ring size is a letter, indicating that it is a UK size. This is because we found we could get a free ring sizer from the British company Wedding Rings Direct. We used this sizer to get an idea of what sizes we would actually print out and test.

Bibit wearing one of our test ring size pieces.


This was a very iterative process -- look at how many different sizes we tested!
Sand casting

Part 2 is sand casting.
We began our pursuit for "sand cast" platinum rings by sand casting bronze rings. These bronze rings would later be replicated in platinum to create our final rings.
Making a custom sand casting flask
The typical flasks that are used for sand casting in the MIT Foundry are much too large compared to the size of a ring. Thus, we made our own sand casting flask out of aluminum tubing, aluminum L extrusion, and some standard fasteners. We decided aluminum was fine for our purposes because we were expecting to cast only up to a few times using them. If we wanted to use these flasks for higher orders of magnitude, we would have used a metal with a higher melting temperature.


The original idea (left) and actual construction (right) of our small sand casting flask.
The original design featured bolts that would apply clamping pressure between the cope and drag halves. After constructing the flask in this manner, we noticed that this method did not adequately locate the two halves consistently. Thus we gave up some clamping pressure in order to mount the two halves in a way that would guarantee better alignment. This compromise was okay because the rings are small enough to not require high clamping pressure. If we had experienced significant flash on our cast parts, we would have reconsidered this strategy (however, it was not a problem).
3D printing the sand casting pattern
To first begin the sand casting process, we needed to create patterns. After selecting the size that fit our fingers best, we made a CAD model of a pattern that incorporated both Henry and Bibit's rings as well as gates and runners. We additionally added thickness towards the finger hole so that the as-cast rough sand finish could be polished during post-processing. We left the outside wall the same because we wanted the rough finish on the outside.


The CAD model of the pattern (left) and the 3D printed patterns (right).
We ended up using this right angle between the rings because it provided a more direct flow of bronze into each ring. We first used a different runner geometry and did not achieve proper filling of our rings. This redesign (as well as a pouring temperature increase) would allow us to get a successful pour.
Pouring
We packed two of our dual-ring patterns so that we would have two attempts per ring in each pour. Our first pour attempt featured the patterns with straight runners (not pictured above). As mentioned, it was unsuccessful in that the ring cavities did not fill entirely.

Our first unsuccessful pouring attempt. Only 1 out of the 4 ring cavities filled completely, and 2 of them filled not at all.
We then knew we had to make some changes to get a successful pour. With the redesign of the gates and runners as well as pouring at a higher temperature, we were able to get 4 successful rings out of our second attempt.

Henry cuts out a funnel for the sprue.


The bronze ingots were melted in an induction furnace (left). The second pour showed much lower viscosity than the first pour (right).


Henry opened up the flask after the bronze had time to cool (approximately 15 minutes since the parts were so small) (left) to discover that all 4 ring cavities had successfully filled (right)!
Post-finishing
Post-finishing for the bronze rings included sawing off the runners, filing the gates, sanding the insides of the rings until they fit each of our fingers, and polishing the insides. We did all of these steps in MIT MakerWorkshop.

First we filed the roughest portions out of the insides of the rings. We did this first so we could hold the ring for easy access using the sprue and runners.


We next used a hacksaw to cut off individual rings (left). Then we used the hacksaw again to cut off the gate closer to the part (right).
Next, we used increasing grits of sandpaper to sand the insides of the rings to size and then to polish the insides as well.

The completed bronze rings!
Replication

Part 3 is replicating the sand cast rings from part 2.
The next step after making bronze sand cast rings that we loved was to begin the process of making copies of them. That first step was to get wax copies, which involved making a silicone mold from the bronze rings.
Silicone mold of sand cast rings
We used a classic two-part silicone mold mix to make the silicone mold.


The layouts for our first (left) and second (right) silicone molds.
We iterated through the silicone mold step twice. Our first attempt had both rings in one mold, which was poured in one shot, and then cut to get the rings and wax out for every wax injection. This mold proved to be difficult in removing the wax rings without warping, so we decided to redo our mold. Our second attempt featured two molds, one for each ring, and each one was made in two shots of silicone with locating features to ensure good alignment between the mold halves with each reset. To make the first mold half for each ring, we fashioned a complementary "mold half" out of modeling clay, onto which the silicone mixture was poured.


Pouring the silicone mold. First we mixed two silicone mold kit compounds together (separate in the left photo, mixing in the middle), then we poured the homogenous mixture into our mold cavities.
For our second (successful) set of molds, we had to do this pouring step twice, once for each half of the mold. The modeling clay is removed from the set first half of the silicone mold, release spray is applied, and then more silicone mixture is poured directly onto the first half in order to form the second.

After the clay half is removed, the first silicone half is exposed. This is the surface onto which new silicone is poured to form the second half.

A completed silicone mold after both halves are poured.
Creating wax copies from the silicone molds


Henry injecting wax into one of the molds (left), and the results of injecting into each of the new molds (right).
This process was the one that was most iterative for us, as the wax can be finicky, and we can be picky. The platinum rings were only going to have (maximum) as much detail as what was shown on the wax copies, so we were determined to get the best copies we could in order to make the investment mold. Plus, injecting the wax was a fairly fast process (the wax cools and can be removed from the mold within a minute of injecting), so it was of little cost to us to make a lot. Any mistakes we didn't want could be remelted and reused.
Investment Casting

The last part of our process took the wax copies from part 3 in order to make investment molds into which platinum could be poured.
Making the investment molds
We used the best wax copies from part 3 in order to make the investment molds. This process began similarly to the steps required to make the silicone mold of our bronze sand cast rings.


A closeup of one of our wax trees (left), and both wax trees in their mold cups, ready to get investment poured.
We made separate molds for each of our rings for a couple reasons. First, to be conservative, since the rings would each have better cast qualities if the flow of platinum was less disrupted. Second, so we could reuse the platinum in the sprue from the first ring in casting the second ring.
Then we mixed investment to pour into these investment flasks. Investment is a lot like plaster, only with much more heat resistance (platinum is cast at around 1850 C).

The investment flasks with unset investment poured in them.
You can see air bubbles at the surface of the investment. These resulted from our tapping the flasks after pouring so as to dislodge as many of these air bubbles as possible.
These flasks were left to set for a couple days, after which the wax burnout and firing cycles could be done.


The wax burnout (left) and the firing cycles (right) in the foundry furnace.
First, the entire flask is heated up above the melting point of the wax inside so that the wax can flow out of the mold cleanly. Next, the flask is flipped over with the sprue aimed upwards for the firing cycle of the investment. This step bakes the mold until it is durable enough to withstand the casting temperatures and still maintain the cavity's surface detail.
Investment casting the platinum
After firing each of the molds, the platinum could be cast!

The centrifugal casting mechanism.
We used the centrifugal casting mechanism in the foundry because it would provide significant force to draw the molten platinum into the mold, ensuring optimal surface finish. This device holds the mold at one end (by the gloved hand) and aligns an angled crucible's opening towards the opening of the mold. In the photo, you can see the unmelted pieces of platinum in the crucible. On the other end of the arm is a counterweight. At its axis of rotation, there is an angular spring.


Melting the platinum.
We used an oxyacetylene torch to melt the platinum in the crucible.

The mold after the platinum had been poured and hardened inside.


Breaking the mold apart revealed the filled mold cavity (left), which was more fully recovered in the right photo.

A failed investment casting attempt.
We had a failed attempt for the second (Henry's) ring, after having poured the first one successfully. This mold cavity did not fill all the way. Because investment casting is destructive to the mold (i.e. recovering the platinum requires smashing the mold with a hammer), we had to remake a new investment mold, starting from the wax copy.

After our second try at getting Henry's platinum ring, we were successful!
Post-finishing
We did the same steps as for the bronze sand cast rings: cut off sprues, sanded off rough features if needed, and polished the inside. This was much faster for these rings than for the bronze rings since the dimensional accuracy of investment casting is much higher than for sand casting. As a result, the inside surfaces were already nearly perfectly polished, as an artifact from our wax copies having smooth insides like the bronze rings.

The finished rings!
Nice photos of the process
We definitely made sure to take nicer photos at the end than the ones we took on our phones along the way.

The completed platinum rings.

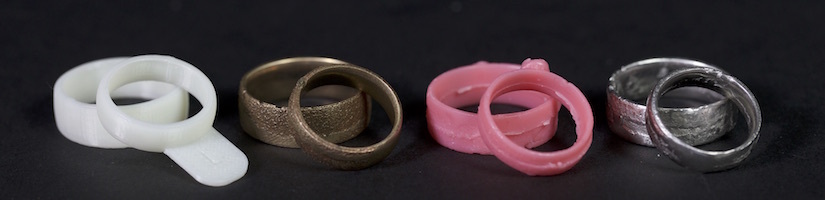
The outcomes of each of the 4 parts of our process: 3D printed ring sizes, bronze sand cast rings, wax copies of the sand cast rings, and platinum replicas.
Ring box too
We didn't stop at the rings -- we needed a nice ring box to go with them.

We selected bocote wood for our ring box.


We used an Othermill in MIT MakerLodge to rout out the box's shape, apply chamfer features, and mill out pockets for the rings (left). Then we used a mill to rout out a pocket for a hinge we purchased (right).

We sanded the parts until we got rid of any tool path marks that resulted from milling the parts. You can see the results of sanding the upper piece in comparison to the other half fresh out of the mill below.


Before (left) and after (right) applying linseed oil to the parts.


The final box, featuring an inset hinge and a magnet to keep it closed.

The final box with rings inside. Fit to house both the platinum and bronze sets.