
HOME / POSTS / GO-KARTS
Go-Karts
March 2006 Bianchini
My dad and I originally got the idea of building go-karts when I was 4 years old. After two wooden boards with wheels sat for years in our playroom, we decided we wanted to finish the project when I was 9. The humble vision of a push-powered soapbox derby transformed into three customized, eye-catching electric go-karts with forward and reverse drive, horn, headlights, and personalized paint jobs for my and my sisters' unique personalities.
Fostering my love for engineering
While my dad was the engineer behind coming up with how to make my ideas work, I was his righthand kid every step of the way. This longterm project taught me how to use power and hand tools, how to go through the design process, and how to troubleshoot problems when they arise.
Progression
Unfinished project from my earlier childhood

The state of the go-karts which my dad had made when I was 4 years old.
The go-karts my dad had made when I was 4 years old had hard plastic tires, wooden block brakes that had to be pulled by hand, a functional steering wheel, and no place for sitting or putting your legs. When I was 9, I encouraged my dad to finish them with me, but with a more ambitious final goal in mind.
Finishing the push go-kart model
First we decided to finish one of them as he had originally planned. This involved building a cover for the front of the car, an adjustable chair for the back, and a mechanical linkage to make the brake activate by pedal.

The state of the go-kart before finishing the original design plan vs. the finished push go-kart .

The brake pedal is mechanically linked to the wooden brake blocks that apply pressure on the rear wheels.
Adding an acceleration pedal
We added a large 12V battery and a motor that was attached to one of the rear wheels via a belt.


I loved driving around on it!
However, the day that this photo was taken, just a couple laps around the driveway later, smoke started to pour out of the leg holes towards my face. I hopped out of the car, and my dad and I discovered that part of the electronics had overheated to the point of catching part of the wood on fire. We quickly put out the flame and brainstormed ways to keep the electronics cooler. A hood vent!
Improvements and finishing the first go-kart
To complete the first go-kart, we first added a hood vent, which involved cutting a hole in the top hood and building a new scoop to go on top. We also swapped out the hard plastic wheels for pneumatic tires, which made for a much smoother ride. Per my request, my dad and I added a couple other electrical features: forward and reverse, toggled with a switch; a horn; front and rear headlights (the front ones peak out the hood scoop!). With those features incorporated, we painted my go-kart, and it was finished! I decided to go for a race car themed paint job, customizing racing stripes and lightning bolts on the side.
Finishing the other two go-karts
We had exclusively been making progress on one of the go-karts so that we could do the iterative process only once before making other copies. First we started building up the wooden frames of the other two. The go-kart for my little sister would be the exact same as mine save for the paint job. My older sister however was already too big to fit on my go-kart, so my dad and I adjusted the hood shape so she could keep her legs bent when inside the car.

My finished go-kart in the back, and two others in progress.

All of the wooden parts are done, save for the hood scoop on my older sister's larger car (left).

All of the electrical parts are done next!

Next the remaining two cars start to get painted.

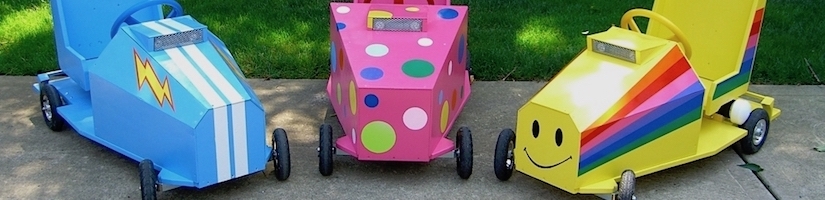
Finished paint jobs!
Coolest rides in the neighboorhood

My sisters and I enjoying our go-karts.