
HOME / POSTS / STAINED GLASS WINDOW
Stained Glass Window
March 2023 Bianchini-Love
Our row house did not previously come with visible house numbers on display. We took advantage over the transom window above our front door to make a stained glass window that features our house number. This was a new process for both of us, and we were surprised by how beginner-friendly it was, requiring only a couple of new glass cutting hand tools and an upgrade to a heavy duty soldering gun.
Design goals and materials
We got a box of scrap glass from a stained glass craftsperson on Etsy. We wanted the numbers in our window to have a funky, chunky font with the numbers touching each other, made of the colored glass shards with random edges. While we initially planned on making the three numbers freestanding with a custom frame that hugged the edges, we ended up filling in the free space with clear, textured glass. This let us use a standard, zinc stained glass came material for the frame.
Laying out and cutting the glass shapes
First we designed the shape and size of the number outlines in CAD (we love Onshape).

Figure 1: CAD drawing of numbers and frame.

Figure 2: Taping together a to-scale printout of the number outline we designed in CAD.
We used the CAD to print out a to-scale template of the numbers. This let us lay out where we wanted to place the glass shards which we would later cut to more precise shapes.

Figure 3: Laying out pieces of scrap glass to cover the numbers in our template.
We had to choose glass pieces that were too large for the space we needed them to fill such that we could cut them to size.

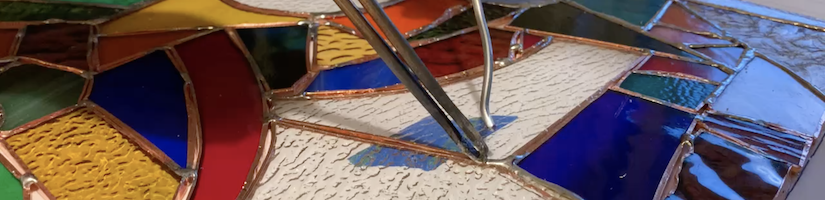
Figure 4: In progress marking and cutting the glass shards to shape.
To cut the pieces to size, the only new tools we used were in this glass cutting set. We marked the cut edges directly on the glass with a sharpie, used a (1) glass cutting tool to score the cut lines, then used (2) special pliers with a curved distal edge that encourages the glass to split along the score line. The glass cutting tool looks like an exacto knife but with a tiny pizza wheel at the end with a sharp, hard edge. In combination, both tools worked very well. The trickiest cuts to make were ones with high curvature or on pieces with a very wobbly surface. Overall, we were able to make nearly all of the cuts we had originally planned, and only a couple times needed to choose a new piece of glass to start over.

Figure 5: All of the number glass pieces are cut to shape.
Taping the glass edges
To encourage the solder to lock in the glass pieces, we applied copper tape on all the glass edges. This is a standard technique. We chose copper tape of a width that allowed the tape to fold over for a millimeter or two on both the front and back of the glass pieces; 1/4" width copper tape worked well for the glass we had. This forms a weak C-channel around the glass edges, and the channel gets reinforced by later melting and bonding solder onto the copper tape.

Figure 6: The glass pieces are wrapped in copper tape around all their edges.
Tacking the glass together

Figure 7: Lasercutting a stencil to hold the number shards in place while tacking.
At this point before tacking the pieces together, we decided to lasercut a stencil for the numbers to hold the shards in place. This would have helped us earlier in the process while we were cutting the glass shapes too.


Figure 8: Using the lasercut frame to help us hold the glass pieces together. We tacked the pieces together with solder before removing the lasercut frame to add the clear empty space.
Adding the empty space clear glass
Video 1: Cutting the last glass piece for the window.
After tacking the numbers' glass pieces together, we removed the lasercut stencil and began cutting textured clear glass to fill the rectangle's empty space. We bought the clear glass (order link) separately from the Etsy colored glass scraps.

Figure 9: Cutting the textured clear glass pieces to fill the rest of the rectangle.
The last step for preparing for soldering was to wrap the clear glass in the copper tape.

Figure 10: All of the glass pieces are cut and wrapped, ready for soldering.
Soldering the glass
Video 2: Example footage of our soldering some of the stained glass window joints.
We used a heavy duty gun-style soldering iron, since the volume of solder to melt at a time for making a stained glass window is much higher than for soldering (most) electronics onto PCBs. The soldering gun worked perfectly in combination with a couple of spools of large gauge solder (we ended up using two full spools of this) and generous amounts of stained glass flux.

Figure 11: Henry as he solders some of the window.

Figure 12: Close-up of some of the soldered and unsoldered joints.
Adding a structural frame
It is not advised to just rely on the soft solder to maintain the structural integrity of the window. Thus it is standard practice to make a metal frame onto which the glass can be directly soldered. We bought several feet of a standard c-channel zinc came that we cut to size with mitered edges. We fit these onto the outer edges of our glass rectangle then soldered directly to it.


Figure 13: Making and soldering a frame onto the window.
Final touches

Figure 14: Done with soldering the glass and frame.
At this point, the window was essentially done! All we did from here was wash and install the window. At this point, many people choose to blacken their solder joints with a chemical blackener. However we liked the brightness of the exposed solder and frame, so we chose to leave it raw.


Figure 15: Washing to get glass dust, specs of disconnected solder splatter, and residual flux off the window. Hank was eager to supervise.

Figure 16: A freshly washed window, ready for installation.
Installation


Figure 17: Before and after from the inside of the house.
Installation was fairly simple, since our transom window has a fixed outer layer of glass and an openable inner layer of glass. We could open the inner layer, insert the new window, then close the inner glass layer back up again.


Figure 18: View from the outside of the house, during the day and at night.
During the day without back illumination, the numbers are visible but not prominent (the reflections make the numbers more difficult to see in photos). The window shines at night when the interior's backlighting makes the colors pop.

Figure 19: Close-up of the window as seen from inside the house.
Overall we love how the window turned out and would recommend making a stained glass window even to beginner makers, as the process was forgiving and the results were rewarding.