
HOME / POSTS / STRUCT SURPRISE TOY BLOCKS
Struct Surprise Toy Blocks
February 2015 Bianchini
Project Documents
I built Struct with a team of 4 other members as part of the MIT class 2.00B. One of MIT's most popular classes, 2.00B Toy Product Design taught by Professor David Wallace and Dr. Maria Yang gives students an overview of design for entertainment purposes. Throughout the process, students develop ideas for new toys that serve clients in the community, and work in teams with local sponsors and experienced mentors on a themed toy design project. The spring 2015 theme was "Surprise"! We made a set of identical (looking) blocks that each behaved differently and surprisingly when interacting with it in a hands-on way.
Brainstorming
Since MIT 2.00B Toy Product Design outlines the process but not the content, it was up to our team of 5 to come up with what toy we would like to make throughout the semester. I came up with the idea of a surprise exploding block, which began our initial inspiration to create blocks with surprise features (though hopefully safer as the project progressed).

Our initial idea poster for Struct featured blocks that looked similar but had special unexpected features.
Prototyping
We weren't exactly sure what features we wanted to have among all of the blocks and if we wanted their differences to be obvious by looking at the blocks before interacting with them. In our prototyping phase, we tackled a few different block functionalities to see which were the most fun to play with and the cleanest to manufacture.
Works-like and looks-like models


Our "works-like" models were made from blue foam, held together with electrical tape. We presented these blocks at a design review (play testing).
We made two kinds of prototypes: works-like and looks-like models. This is a common product design technique early on so users can get a sense of how the product will work in addition to what it would actually look like. For simplicity on the part of the designer, keeping the two separate makes the process go faster.
Our works-like models were made out of blue foam with different inserted components inside, then held together with electrical tape. These blocks included features like asymmetric center of mass and magnetic attraction/repelling. Less functional works-like models included an "exploding" block that would eject a component when buttons were depressed, and a "fall apart" block that separates when oriented a certain way.

The "exploding" block (foreground) and the "fall apart" block (background) prototypes.
For the looks-like models, we tested out a couple different looks and feels. We used three different materials: wood, foam, and acrylic, which were additionally natural wood colored, bright red, and optically clear. The clear option would only be used if we wanted our users to be able to see how the blocks worked.

Our preliminary looks-like blocks.
Play testing results from our prototypes
After presenting these blocks and doing some play testing with some kids and adults, we determined that we wanted the blocks to all look the same, since our targeted age group would be 4-6 years old, when their hands-on curiosity is high, as well as their interest in surprises. This eliminated the clear housing option. We eliminated the wooden housing option ourselves since we knew we could produce plastic housing more easily with hollow insides for our surprise components.
Works-like and looks-like models incorporated together
Our next step was to incorporate functionality and aesthetics into one prototype, but to make them with still lower-fidelity materials and processes. We decided to make another round of foam blocks, but with more visual appeal.

Our fully functional prototype.
We painted these blocks to make them more appealing for our users. These blocks had features like the previous round of prototyping, including asymmetric center of mass and magnetic attraction/repelling. We additionally made on the side a circuit that could be completed when oriented a certain way, using a steel ball to touch two contacts and close the circuit. We decided to use that for our final version for vibrating and buzzer features.

Users tested out our blocks.
Final design + fabrication
We made our final design to incorporate five different block behaviors:
- magnetic attraction/repelling
- asymmetric center of mass
- buzzing
- vibrating
- falling apart
We designed for a hollow plastic housing, which we made by thermoforming sheets of ABS plastic into halves, which we would then stuff with components, then glue together.


We used a CNC router to machine the thermoforming molds, which were then used with a thermoforming machine to fabricate the plastic housing halves.
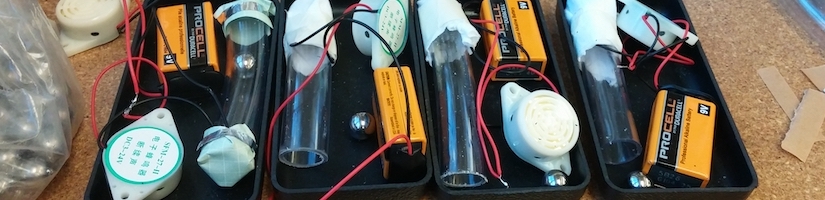
Only the buzzing and vibrating blocks required electrical components. These internals were constructed using the steel ball technique we devised earlier. When the block is oriented one way, the steel ball rests across two metal contacts, which would complete a circuit and make either a buzzer sound or a vibration motor actuate.

The inside of a buzzing block.
 We made multiples of each block type so we would have enough blocks for fun play testing.
To brand the blocks, we used Adobe Illustrator to make a logo. We used a vinyl cutter to cut stickers of this logo, which we then placed on every big face of our blocks.

The Struct logo.


The vinyl cut stickers applied to all the blocks.

Completed blocks piling up!
Final outcome
Our final blocks performed as we wanted them to behave. Check out their individual behaviors below.
Attracting/repelling blocks.
Vibrating block.
Beeping block.
Uncentered center of mass.
Fall apart block.

We could achieve "impossible" structures with our blocks!
Playsentations
At the final 2.00B playsentations, we presented Struct with an exciting story and demonstration of the blocks. We ended the playsentations with a bang ;)
Playsentations 2015 - Tiger from MIT Toy Product Design on Vimeo.